As we consider a mac user’s renewed quest for GPU performance – this time for an ‘external’ GPU in a tbolt2 PCI chassis – we find similarities to other timeless quests. For instance, in our quest, the path is not clear in the beginning, and there is conflicting advice about how to proceed. The establishment is against us, and success may be temporary due to an ever-shifting and occasionally hostile landscape. The journey is fraught with peril, and you fully expect impasses surmountable only through deep soul searching and great courage. Also we have to assemble items from the marketplace and maybe perform a heroic deed.
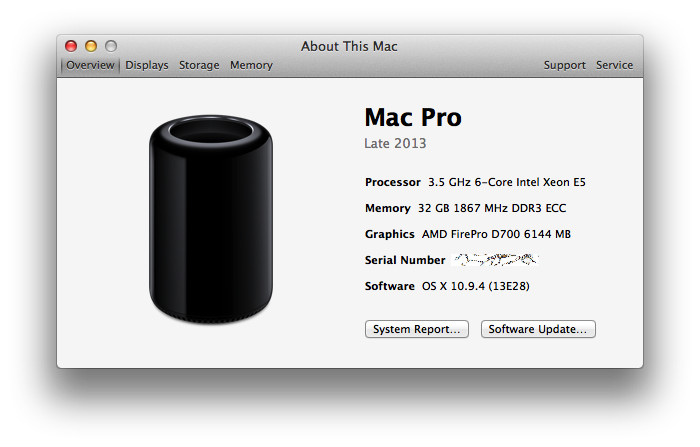
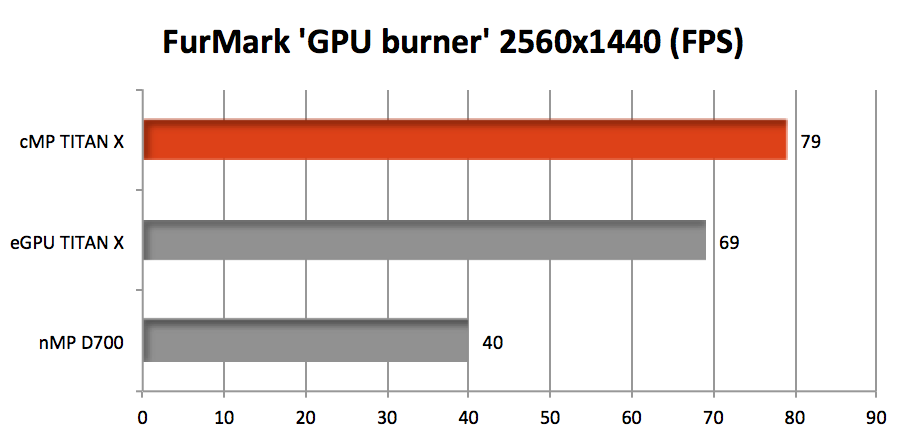
My first thought was that tbolt2 wouldn’t have the bandwidth to let a fast GPU to shine. While it is true that a fast card would be limited by tb2, it’s still totally fast enough to outperform the MacPro6,1 d700s for many workloads. From the barefeats post:
Even when ‘hobbled’ by the limited bandwidth of Thunderbolt 2, the eGPU TITAN X ‘buries’ the AMD FirePro D700 on this OpenGL test.
The Diablo III results in that same post are even crazier. The new mac pro gets 78 fps with the internal d700 and 124 fps with a geforce titan x in an external tb2 chassis. Pretty not bad. Here’s the kicker: a six year old 2010 Mac Pro scores 167 fps (with the card installed in a legacy PCI slot. I mean a PCI slot. Heyo.)
My task is to pick a set of tradeoffs, optimizing in order for: performance, build simplicity and cleanliness, [ergo | cost]. The most commonly used thunderbolt2 chassis for hosting GPUs seems to be the Akitio unit, even though it’s a bit too small for many cards (but you can bend it and / or not close the back hatch), and the power supply is too weak to push a decent card. On the up side, the $200 – $300 price is comparatively low. The Akitio case doesn’t seem well equipped to power a fast GPU, and many of the builds I can find just have the components splayed out on the desk…
eGPUs all splayed out. credit: nesone from techinferno forums.Others decide to transplant the Akitio board into a larger case with enough room for an ATX power supply and a full size card or two, and without leaving the back door open.
*
I once was told a very short story about how GPU drivers are all dens of mutual patent infringement, where everyone is guilty and they all just keep it ‘secret’ and carry on. Doing unsupported things with GPUs tends to require some negotiating with and gentle coercion of your computer system. Learning the secret handshakes in the first place is a mysterious business, and it’s easy to imagine all manner of unsavory behavior and sundry cut-throat affairs in this trade.
Our quest has produced one such tale already. There’s a person called netkas who did a lot of the groundwork in bootstrapping the “eGPU” scene… operated a forum, was responsive to people, helped them build their rigs, etc. Netkas then offers a service where if you provide diagnostic details from your system while your eGPU stuff is plugged in, you will be told whether your rig is viable. If it is viable, for the price of $20 you will be taught to sing the haunting melody that subdues OS X and brings your GPU to life. This paid service seems like a reasonable way for customers to support the ongoing work of playing cat and mouse with the vendors. People were grateful.
Very shortly after this service started and began yielding happy customers, it is said that a rival player known as goalque (seemingly well regarded by his side of the internet) inspected the work of netkas and generalized it into a rather burly shell script that now sits in goalque’s github repo. It may be executed by anyone for no fee, much to the continued frustration of the netkas camp. The feud lives on, with the scene’s two popular forums (netkas and techinfernal) appearing to come down on opposing sides, all of which is completely inconsequential to the users, who are all either stoked to pay $20 to netkas to light up their rig, or stoked to run a shell script from github to light up their rig.
