SI File Transfer, Entity Capabilities, iChat, and Your Jabber Bot

What do these things have in common? This is the only place on the entire internet where you can read useful information about all of these things.

I’ve toyed with jabber bots before, mostly using the various XMPP stacks available for Python. This time, I wanted to find something even more high level, and I think I found it in Blather – the example echo bot weighs in at 9 lines of code, including the 2 require statements. Trying to send it a file, however, results in this:

unable-to-receive

I spent a while figuring out what’s required of a jabber bot so that iChat Messages will allow its user to send a file. Researching XMPP file transfer might not be such a mystical odyssey if you were implementing everything from scratch, but if instead you’re trying to (ostensibly) save some time and write as little code as possible, the path isn’t terribly clear. In this case, I ended up learning a fair amount about XMPP. ~20 hours of fervent web searching and reading yielded ~3 lines of code.

I found one solitary post from somebody writing a Blather bot who had this same problem. He was informed that the bot needs to advertise the correct set of capabilities for file transfer, however that guy wasn’t sure what they were. Somebody else chimed in, but that response was broken and also incomplete – but it was enough to put me on the right track. The minimum set of capabilities needed to be a XEP-0096 compliant file transfer recipient  are:

    <feature var="http://jabber.org/protocol/ibb"/>
    <feature var="http://jabber.org/protocol/bytestreams"/>
    <feature var="http://jabber.org/protocol/si"/>
    <feature var="http://jabber.org/protocol/si/profile/file-transfer"/>

Here is a working XMPP bot that can receive files sent by another client, using the XEP 0096 spec. Running it looks something like this:

csbot@botboy[~/cs-bot]ruby xmpp_receiver.rb
Connected to talkman@talk.example.com/1376830693085. Sent capabilities:
<iq type="result" id="blather0001">
  <query xmlns="http://jabber.org/protocol/disco#info" node="http://dreness.com/csbot#cc5+HwPwVxjmjK9bPjmuvv/Ehh8=">
    <identity name="csbot" type="bot" category="client"/>
    <feature var="http://jabber.org/protocol/ibb"/>
    <feature var="http://jabber.org/protocol/bytestreams"/>
    <feature var="http://jabber.org/protocol/si"/>
    <feature var="http://jabber.org/protocol/si/profile/file-transfer"/>
  </query>
</iq>

Receiving file from dre@xomg.example.com/foci
<file xmlns="http://jabber.org/protocol/si/profile/file-transfer"
  xmlns:ichat="apple:profile:transfer-extensions"
  name="btc-watcher.py"
  size="5387"
  posixflags="000001ED"/>


Posted in bit bucket | 7 Comments

Longcuts occasionally form when shortcuts conspire

Saw a tweet about one of those one-touch ‘build me a VM’ things for Oracle server + rails and decided to try it; this one is mostly driven by some software called vagrant, which seems cool enough. It definitely doesn’t seem like it’s supposed to be hard.

Everything was going fine until one of the child scripts reached for an RPM I was supposed to have downloaded and placed in specific spot – which I did. The error is:

err: /Stage[main]/Oracle::Xe/File[/home/vagrant/oracle-xe-11.2.0-1.0.x86_64.rpm.zip]:
Could not evaluate: Could not retrieve information from environment production
source(s) puppet:///modules/oracle/oracle-xe-11.2.0-1.0.x86_64.rpm.zip at
/tmp/vagrant-puppet/modules-0/oracle/manifests/init.pp:100

I looked, and sure enough the file is totally there – I copied it there! Ah ha, but Safari helpfully decompressed it for me, leaving a naked .rpm, which vagrant seemingly isn’t prepared to handle. Ok, whatever… zip it:

cd puppet/modules/oracle/files
zip -r oracle-xe-11.2.0-1.0.x86_64.rpm.zip oracle-xe-11.2.0-1.0.x86_64.rpm

Try again: vagrant destroy ; vagrant up. Faile. This time, the error is:

err: /Stage[main]/Oracle::Xe/Exec[alien xe]/returns: change from notrun to 0 
failed: /usr/bin/alien --to-deb --scripts Disk1/oracle-xe-11.2.0-1.0.x86_64.rpm 
returned 2 instead of one of [0] at 
/tmp/vagrant-puppet/modules-0/oracle/manifests/init.pp:129

Uh… what? two instead of one of zero. Ok… As I was reading the zip man page, I remembered that I totally don’t like zip, leading to the immediate assumption that even though zip exited zero, it didn’t produce output that vagrant was expecting. In a little rodent voice, my mind said “probably some kind of silly directory nesting crap”.

I revoked Safari’s archive expanding credentials and re-downloaded the rpm.zip, and copied that zip file into the puppet staging area. This time it all worked!

notice: Finished catalog run in 1401.84 seconds

Oracle is all ready to go!

{56} andre@foci [work/rails-dev-box-runs-oracle] % vagrant ssh
Welcome to Ubuntu 12.04 LTS (GNU/Linux 3.2.0-23-generic x86_64)
 * Documentation:  https://help.ubuntu.com/
Welcome to your Vagrant-built virtual machine.
Last login: Fri Sep 14 02:23:18 2012 from 10.0.2.2
vagrant@rails-dev-box:~$ sqlplus
SQL*Plus: Release 11.2.0.2.0 Production on Tue Jul 30 00:12:34 2013
Copyright (c) 1982, 2011, Oracle.  All rights reserved.
Enter user-name: ^C
vagrant@rails-dev-box:~$ tnsping localhost
TNS Ping Utility for Linux: Version 11.2.0.2.0 - Production on 30-JUL-2013 00:16:24
Copyright (c) 1997, 2011, Oracle.  All rights reserved.
Used parameter files:
Used HOSTNAME adapter to resolve the alias
Attempting to contact (DESCRIPTION=(CONNECT_DATA=(SERVICE_NAME=))(ADDRESS=(PROTOCOL=TCP)(HOST=127.0.0.1)(PORT=1521)))
OK (0 msec)

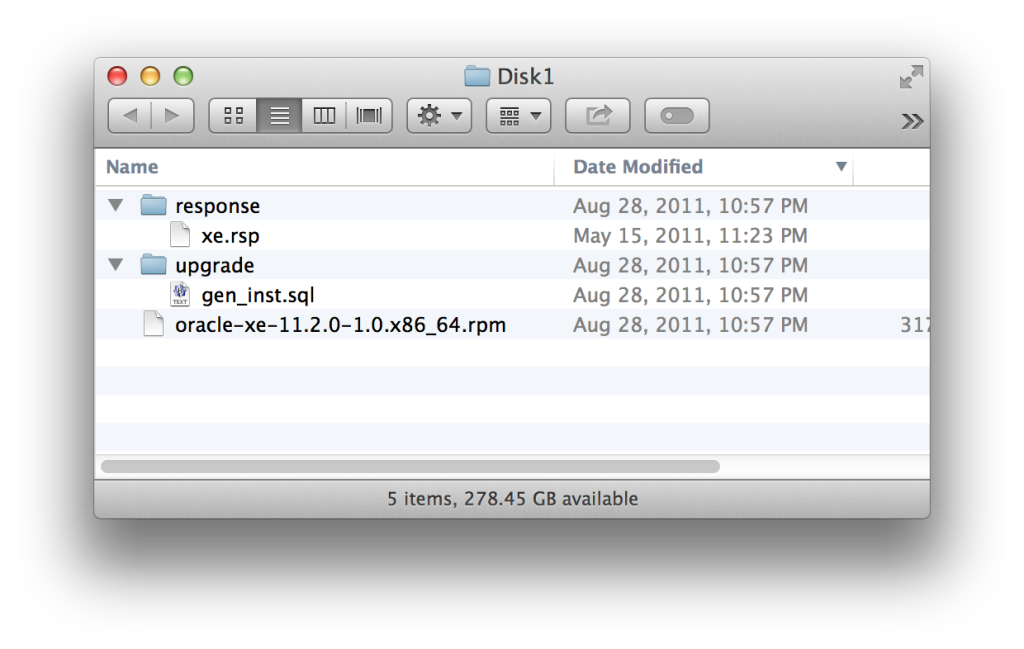
Looking back in Finder, I did eventually notice that the zip file expands to a directory called Disk1, from which I copied the rpm to the puppet staging area without realizing I was not copying from the downloads folder.

nested things...

I used “Show in Finder” from the safari downloads list to get there (which can be done successfully without reading anything, since the position is dependable), and somehow didn’t notice the extra nesting; and I used drag-and-drop to insert the file path into a waiting Terminal window to cp it into the puppet area, so I didn’t ever type “Disk1”. Drive safe!

Posted in Pro Tip, The More You Know | Leave a comment

foci: MacBookPro10,1

I got one, and I really like it! This post will focus on just a few attributes of the new hardware that are salient to me.

Model Name: MacBook Pro
 Model Identifier: MacBookPro10,1
 Processor Name: Intel Core i7
 Processor Speed: 2.7 GHz
 Number of Processors: 1
 Total Number of Cores: 4
 L2 Cache (per Core): 256 KB
 L3 Cache: 6 MB
 Memory: 16 GB

Previous to this, my newest Mac is a top-end 2011 MacBookPro (the first vintage with thunderbolt), which I only mention because it’s crazy how much the hardware has changed in two years – even compared to a laptop with thunderbolt and SSD – beyond the expected ‘smaller / faster / cheaper’ improvements to components. I’ve only had a couple days with it so far, but here are some highlights of the differences:

  • Retina. Amazing feature that also presents some amazing challenges.
  • Additional thunderbolt port, which turns out to be the answer to
  • No built-in ethernet or firewire
  • No external case lights! None! Not a battery charge indicator, nor a system power indicator!
  • Somebody clearly wanted the speakers to be badass.
  • No optical drive (good riddance, imo – as long as you have one in the house somewhere)

Overall, it’s a fantastic upgrade, however there are a couple things that give me pause. I’m not really prepared to designate any of the negative-sounding items above as problems; they are tradeoffs, so the questions I ask are: Are these tradeoffs a good deal for me? Are they a good deal for an average user?

The first item of concern for me was the lack of built-in ethernet and firewire. I’m kind of a networking geek, so ethernet is important to me for a variety of reasons, even beyond the 900 Mb/s speed difference as compared to wifi:

  • isolation of network traffic for troubleshooting / exploratory purposes
  • remote attach via gdb (and possibly also support for uploading kernel core dumps)
  • better security
  • much better maximum density (there isn’t really that much wireless spectrum, while ethernet is only limited by the physical space occupied by the gear itself)

Of course most people probably don’t care much for the above, and I fully recognize that, which is why I’m now the owner of two shiny thunderbolt –> ethernet dongles, which are probably also the smallest ethernet NICs I’ve ever used. As far as I can tell, the entire ethernet feature set is supported – although I haven’t quite tried everything yet. One of the hardest parts (for me, not sane people) was figuring out good names for the dongles for use in static DHCP / DNS maps (since they each have a unique MAC address, and since they are highly interchangeable between hosts – granted, right now I only have one mac without built-in ethernet, but… ya know. Future-proof naming conventions are a thing ;)

Ok, so what do we gain in exchange for no ethernet / firewire, then? A case that is thinner than either of those connectors, which Apple achieved years ago starting with the MacBook Air. I think this is worth it, even for somebody like me who can enumerate reasons for wanting ethernet. The thunderbolt –> firewire dongle also seems fully functional. The additional flexibility of having either two ethernet ports or two firewire ports is also cool.

The tradeoffs for the no external case lights are perhaps not quite as obviously beneficial. Let’s start with the battery charge indicator. To me, battery charge level is useful information, and it is useful to be able to get that information with the lid closed – which is probably why Apple laptops have supported this for so long. As far as I can tell, this feature is gone for no gain other than the material benefit of omitting those parts, and perhaps simplifying the manufacturing and internal configuration by some (possibly significant) amount. Although a fairly minor issue, I’m putting this one in the sad-face column.

My internal jury is still out regarding the lack of a system power / activity light. Several times so far I have powered or rebooted the machine and waited through what seemed like a long POST, with *no* ability to tell if the system was on. I find this to be completely uncool, and even reasonably frustrating. What would I do differently with this information? Things that most users don’t do. I get that. The problem is, there is really no workaround, unlike with ethernet and firewire – and I’m completely serious in saying that I would buy a thunderbolt system power LED dongle, were it available. Not for regular use, but for when the shit has hit the fan. I really dislike the notion of removing useful information outlets, even if that information isn’t required all the time.

So what do we gain in exchange for no power / activity LED? As far as I can tell, the lines between system states are blurring, and there is the increasing possibility of transitions between states that might be ‘unwanted’ (i.e. noticeable == distracting) if the user knew they were happening (Power Nap for example), and it’s obvious to want to mitigate that potential annoyance. However, I still believe it would be a false choice between keeping the power indicator as-is, and annoying users with unattended state transitions. Why not change the LED behavior to not annoy or distract during Power Nap, but also still indicate system vitals when that knowledge is helpful? Other examples of when it’s helpful: maybe the system is asleep, and I want to shut down to save battery; or maybe I shut the lid but the system didn’t actually sleep (so now I need to find out why, and make it sleep). I realize both of these are things that users *shouldn’t* have to worry about, but I live in the world that exists, not the world that should exist, and these have both been part of my usage pattern for every laptop I’ve ever owned. Accordingly, lack of power / activity LED will probably go in the sad-face column, but I will allow time to determine the extent to which these issues are still present on this new hardware.

Regarding the retina display; the visual quality is amazing, and has given me a renewed appreciation for OS X UI aesthetics. I can really feel all the additional visual information  and extra detail. So that’s the up side, and it’s hard to over-state this impact. Also interesting: the retina laptop hasn’t ruined the non-retina counterpart for me, like both the iPhone and iPad did.

Now, the other end of the tradeoff: I’m one of those people who is very sensitive to frame rate and animation performance. I had no illusions that retina resolutions would be as performant in all areas as compared to non-retina, on today’s GPUs. For the most part, performance is acceptably good for most common animations (scrolling, panning spaces), but some stuff animates slowly (resizing), and a few things animate very slowly (resizing with many sub-views). The increased drawing workload doesn’t really present any usability restrictions in day-to-day operation, but some workflows are notably impacted. For example, screen recording software now has a lot more work to do, and is usually resource-constrained even in non-retina resolutions. Initial screen recording test results are better than I expected, but there’s just no getting around all that extra work, and it will force me to change the way I do screen recordings (i.e. set the display resolution as low as possible; avoid heavy-handed animations).

Overall responsiveness feels notably improved compared to the 2011 MBP, in spite of occasionally slower drawing – probably due to the increased memory and CPU performance. SSD performance feels roughly the same. Raw CPU performance is moderately improved; here’s a quick encoding benchmark comparing these two laptops and my Mac Pro:

Source file: 1.4 GB QuickTime movie, 00:27, 1920 x 1200 @ 60 fps, ProRes 422
Re-encoded here using the avexporter sample code available from Apple

avexporter command used:

time avexporter -dest ~/t -replace -preset AVAssetExportPreset1920x1080 -source ~/Movies/wow.mov

Each config tested twice. Total elapsed wall-clock time for each test in bold. Lower numbers are better :)

# MacBookPro8,2 Intel Core i7 2820QM @ 2.3 Ghz / 32nm “Sandy Bridge” / Early 2011 (thor)
326.51s user 11.64s system 447% cpu 1:15.55 total
325.68s user 11.63s system 448% cpu 1:15.29 total

# MacPro4,1 Intel Quad Core Xeon W5590 @ 3.3 Ghz / 45nm “Nehalem” / Early 2009 (rune)
324.57s user 10.70s system 451% cpu 1:14.24 total
323.17s user 10.56s system 451% cpu 1:13.97 total

# MacBookPro10,1 Intel Core i7 3820QM @ 2.7 Ghz / 22nm “Ivy Bridge” / Early 2013 (foci)
270.30s user 10.58s system 446% cpu 1:02.97 total
269.87s user 10.47s system 445% cpu 1:02.95 total

Posted in bit bucket | 1 Comment

Site Redesign Complete

I’ve finally finished with the site redesign, featuring a little custom javascript header – roll over the images to see other images. These are loaded from URLs in a JSON document, so it’ll be easy to add new images over time.

As this WordPress site is now also the dreness.com homepage, I’ve imported all the old LiveJournal entries previously found there into WordPress.

Posted in bit bucket | Leave a comment

Traffic Shaping with pfSense and HFSC

Traffic Shaping with pfSense and HFSC (youtube)

This screencast demonstrates the use of a pfSense device for traffic shaping on a typical home network, with the goals of minimizing latency and maximizing throughput. In particular, we use a three-tier queue configuration where a parent speedboost queue on each interface contains leaf queues that catch all the traffic. The speedboost queues use HFSC’s non-linear service curve to match the behavior of the comcast speedboost. The leaf queues are configured to partition the available bandwidth, and automatically allow ‘borrowing’ when there is no contention.

Section links:
Installation / Setup: http://www.youtube.com/watch?v=EfXImr5q-sw&t=3m01s
Monitoring: http://www.youtube.com/watch?v=EfXImr5q-sw&t=6m30s
Traffic Shaping: http://www.youtube.com/watch?v=EfXImr5q-sw&t=15m34s

In a future video, I will go into more detail about how the sharing happens when there is contention, and some additional techniques for testing these usage patterns.

Feedback is welcome! Especially from people who know more about this stuff than I do…

Here’s the slide deck.

Posted in tutorials | Leave a comment

Backfill

In preparation for a dreness.com site redesign, I am migrating away from LiveJournal, my longtime (but mostly abandoned) personal blog. WordPress offers import support from various sources, including LiveJournal. I let it grind for about 30 minutes and it got all 300+ LJ entries and all their comments. Awesome! Any non-public entires are set to be password protected by WordPress; I’ll probably figure out some way to remove those from the public listing…

The combination of this blog’s existing content plus the LiveJournal stuff results in pretty complete coverage of my activities back to May 2001. Woot!

This post also marks the introduction of RETINA GRAPHICS, via the WP Retina 2x plugin.

backfill

Posted in bit bucket, lj | Leave a comment

Permissions updated…

Spambots have been running wild lately, so I’ve tightened this site a little. To post a comment, users must be logged in and must have a previously approved comment – otherwise the comment goes into moderation queue.

** UPDATE

They really went crazy for reals, so I added a captcha for registration, and also mass-deleted hundreds of bogus accounts. I’m pretty sure I deleted some legit ones as well, as there’s no easy means for distinguishing them in the wordpress user list… so sorry, babies :/

Posted in bit bucket | Leave a comment

How I fixed broken internal audio by zapping pram

Oops. I think I stole my own thunder. It was a serious wtf moment though… by all rights, I really don’t think this is supposed to happen. The worst part of this experience is not the increasingly frantic hour of me trying all the ‘right’ things to fix my apparently dead internal audio, failing, and then feeling queazy about the prospect of having to get a new mac pro right now. That was uncomfortable, but temporary. The worst part is that I can no longer mock people who zap pram in attempts to fix random problems that were never intended to be fixable by a pram reset. I wonder what mysteriously beneficial effect permissions repair has…

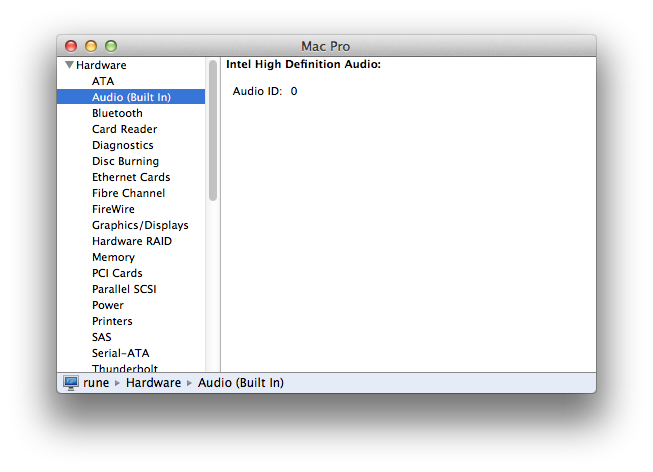
To continue the upside-down nature of this post, I should mention that the initial damage appears to have been done by windows 7, which I installed on a dedicated internal HDD via the BootCamp Assistant. It all appeared to be going well for the first couple days (of my Tera blitz, during which I didn’t boot over to OS X even once), but then I bounced back to OS X and was stymied by both a much longer than average boot time, and also… no internal audio. Apple System Profiler didn’t see much of anything:

system profiler window showing a basically empty window where the details of the internal audio device should be

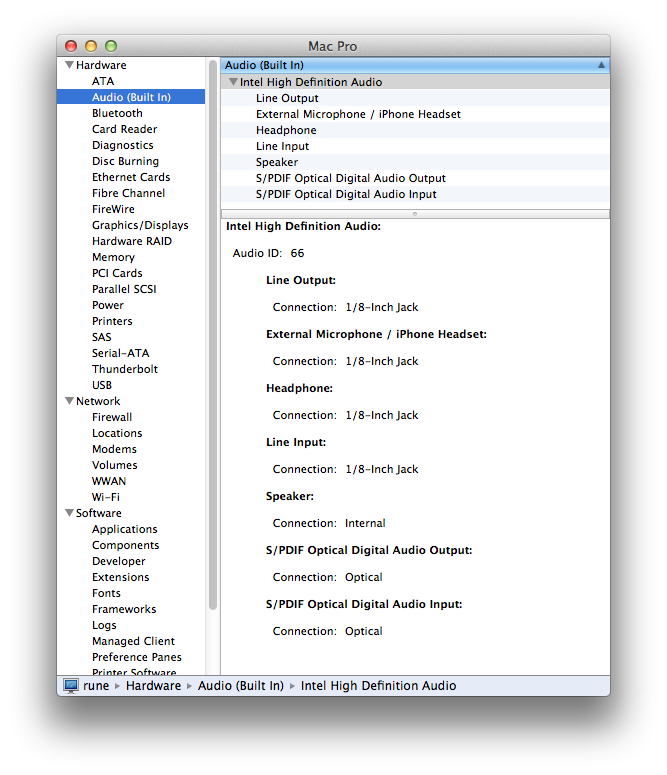
I did several normal reboots, shutdown –> boot cycles, disconnection of various extra hardware and peripherals, SMC reset… but nothing was helping. The first time I booted back to win7, it offered to re-install the drivers. Windows could see the internal audio device (which it believes is of the RealTek variety) and allow me to select it as the default device, but still no actual sound was emitted. I figured it was kinda toasted at that point, but then, not expecting it to work, I zapped pram, and lo and behold:

system profiler window showing normal internal audio device details

Boot time is back to normal, too. Hopefully I don’t need to add any permanent pram cheese to this bootcamp sandwich…

UPDATE 1: oh noes, this is totally reproducible. Basically every time I go from win to mac, the audio device goes away until I zap pram. a bug has been filed.

Posted in mac pro, OS X | Leave a comment

Ubuntu Development Bootstrap

Linux hackers surely already know this, but I’m only sorta a Linux hacker. This post documents a nice process for using apt to prepare an Ubuntu machine for development. In my case, I was trying to build a custom version of irssi that is patched to add SSL support to the irssi proxy module. Sure, I could have gone about this in the traditional manner, but given that irssi has a fair number of dependencies, it’s easier to let apt do the grunt work for me.

First, get the toolchain set up.

sudo apt-get install build-essential checkinstall

The build-essential and ‘check install’ targets are news to me. Build-essential, as the name suggests, includes some compilers and related tools that would be needed for building just about anything.

Checkinstall keeps track of all files installed by a “make install” or equivalent, creates a Slackware, RPM, or Debian package with those files, and adds it to the installed packages database, allowing for easy package removal or distribution.”

Next, in preparation for building irssi itself, get all the dependencies for irssi. This works because irssi is already in the apt package database, so apt knows what the dependencies are.

sudo apt-get build-dep irssi

From there, download the irssi source, patch it, and proceed to build / run / install it (perhaps installing with checkinstall so you can easily remove it later!)

p.s. this irssi proxy SSL patch isn’t working. bummer.

p.p.s stunnel works though!

Posted in development | Leave a comment

Gnuplot time-series buckets quickie

Let’s say you’ve got a log file of events with time stamps; the nature of the events isn’t relevant, and let’s say the stamps look like this:

14/Mar/2012:17:49:34
14/Mar/2012:17:49:39
14/Mar/2012:17:49:40
14/Mar/2012:17:49:41
14/Mar/2012:17:49:58
14/Mar/2012:17:51:46
14/Mar/2012:17:52:56
14/Mar/2012:17:52:57
14/Mar/2012:17:53:16
14/Mar/2012:17:53:17

You want to create a graph of the frequency of events in the log file, with time on the x and frequency on the y. An easy tactic here is to put the events into buckets, and then find the count of items in each bucket. If we use a bucket size of one minute, we can simply lop off the seconds field, and then use ‘uniq -c’ to produce our frequency count for each minute:

cat test | cut -d: -f 1-3 | uniq -c
 6 14/Mar/2012:17:49
 2 14/Mar/2012:17:51
 4 14/Mar/2012:17:52
 3 14/Mar/2012:17:53

Then with gnuplot:

set xdata time
set timefmt "%d/%b/%Y:%H:%M"
plot 'events_per_minute.txt' using 2:1 title "events per minute" with impulses
Posted in scripts | Leave a comment