
SSH Tunnels for Fun and Profit
SSH tunnels can solve at least two problems. First, you can use an ssh tunnel to encrypt sensitive data as it traverses an insecure network. Secondly, reverse ssh tunnels can be used to provide remote access to services located behind a NAT device and / or firewall. The second has proved most useful to me, but we'll cover both.
Background
TCP is a very common protocol used by computers to allow applications to talk to each other. For example, your web browser (application) requests a document from a web server (another application) running elsewhere - TCP is responsible (in part) for allowing your browser to talk to the remote server over a network of some sort. Part of this process involves creating a session, which is sort of a logical 'channel' that is maintained across a packet-switched network (as compared to, say, a circuit switched network). This channel allows the two parties on either end (the browser and the server) to conduct (possibly) useful communication across a potentially extremely diverse network (say, the Internet), regardless of the physical path that the data is actually taking.This is the difference between a packet switched and circuit switched network; within a circuit switched network, there is generally a physical 'line' being dedicated to your conversation, a good example of which is the traditional telephone system. In a packet-switched network, everybody's conversations are broken up into little bits that all travel along the same physical medium. Familiar examples of packet-switched networks include the postal mail system (physical papers and such), and automotive travel. It makes a lot of sense, really... packet-switched networks tend to make more efficient use of resources.
Interestingly enough, the physical (circuit-switched) metaphor for session-based communication bleeds over into the way that TCP is implemented. Even though the underlying network is packet-switched, the applications themselves still use a more traditional 'port' model for describing the two endpoints of a session. Fortunately, physical things are easy to visualize.
The endpoints of a TCP session are described using two different values: the IP address and the port number. An IP address distinguishes a machine from other machines, and there are some 65,000 different ports to allow a computer using a single IP address to keep different kinds of traffic seperate. So, to clarify, for any TCP session, there are two endpoints, and each endpoint is referred to by the IP address and port.
IP address are fairly easy to keep track of; either your have a static IP address, or it is obtained automatically by your computer using the DHCP protocol. What about port numbers, though? Where do they come from? Well, as I mentioned, they range from 0 to 65,535, and there are three groups within that range. 0 - 1023 are the 'well known' ports, 1024 - 49151 are 'reserved ports', and the rest are 'dynamic / private' ports. The well known ports are so called because common services generally accept connections within this range. For example, web servers listen on port 80; ssh servers on port 22. Remember, these ports are just used to keep different kinds of traffic seperate. I could connect to a web server on port 80 with an ssh client, but the ssh client wouldn't know what to do, since the other end isn't speaking ssh. Also, there is no hard limit on the number of sessions that can be active on a specific port.
When a connection is made to a web server, for example, it is directed at port 80 on the webserver, so port 80 is the destination port. The connection goes out over one of the dynamic / private ports, which would be the source port. To illustrate, consider this scenario in which a client is talking to a server using both ssh and http:
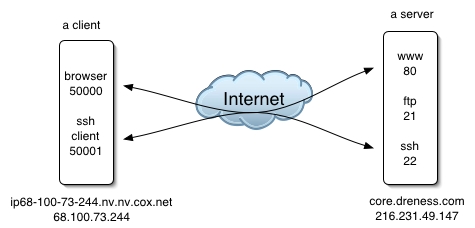
A packet sent from the client to the server's web service might look like this:
*****************************
*   To: 216.231.49.147:80   *
* From: 68.100.73.244:50000 *
*  Data: "can I have this:  *
* http://core.dreness.com/" *
*****************************
*****************************
*  To: 68.100.73.244:50000  *
*  From: 216.231.49.147:80  *
*    Data: "here ya go!"    *
*****************************
Case 1: SSH Tunnels to encrypt traffic
Let's suppose that I'm at a Starbucks and I wanna check my email, but I know that there are evil hackers hiding in the bushes sniffing every packet sent to and fro. Let's also suppose that I'm using standard non-encrypted IMAP authentication, in which case my email password is sent in clear-text. Let's also suppose that I have a *nix box on the 'net that I can use as the remote end of the tunnel. What we can do is create an ssh tunnel between my laptop and the unix box. This tunnel will carry my IMAP traffic in an encrypted form, so that my password is no longer in plain text. Heres's the basic layout: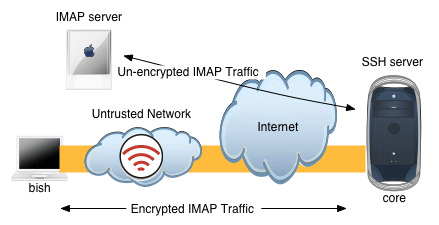
When an SSH tunnel is created, TCP connections that are directed into the 'entrance' of the tunnel, will come out the other end and then continue on to some destination that we specify. In order to facilitate this, SSH binds a TCP port on the local end of the tunnel (i.e. my laptop, in this example). Any connections that are made to that local TCP port will go through the tunnel, then out the other end. For our purposes here of tunneling IMAP, that would require me to tell my mail client to connect to this newly created local TCP port, instead of to the normal IMAP server address. It also requires that I specificy a destination for traffic once it reaches the other end of the tunnel, which will be my IMAP server's address (and port).
This kind of tunnel is created on my laptop, but requires a valid SSH account on the SSH server. Here's how to make the tunnel (I assume that you are familiar with a unix shell).
andre@bish[~]ssh -L 42424:imap.server.net:143 -f -N andre@core.dreness.comThe -L option specifies that this is a 'local' SSH tunnel, which listens on port 42424. Next we specify the destination of the traffic once it reaches the other side of the tunnel: imap.server.net, on port 143. Next comes a couple of command line options: -f tells ssh to background itself (instead of trying to maintain interactivity in the shell, which we don't need); -N tells SSH not to execute any commands on the remote machine, such as your normal login shell. Finally, we specicify the other endpoint of the tunnel: core.dreness.com.
When I execute this command on my laptop, SSH binds the local port, authenticates with core.dreness.com, and then prepares to handle incoming connections on the laptop on port 42424. Here's what it would look like:
andre@bish[~]ssh -L 42424:mail.mac.com:143 -f -N andre@core.dreness.com
andre@bish[~]telnet localhost 42424
Trying 127.0.0.1...
Connected to localhost.
Escape character is '^]'.
* OK Netscape Messaging Multiplexor ready
What I've done is opened the tunnel, and then opened a telnet session to the local end of the tunnel. I am now connected to mail.mac.com on port 143. The traffic is being relayed in an encrypted state between my laptop and core, then between core and mail.mac.com in its normal, plaintext state. Note that I didn't have to enter my password after I issued the SSH command becuase I have the SSH hostkeys set up for passwordless authentication.
Once this session is open, we can examine the TCP sessions using netstat:
andre@bish[~]netstat -na | grep -i listen
tcp4       0      0  127.0.0.1.42424        *.*                    LISTEN
Here I see (among other things) that SSH has created a socket on port 42424. It is only listening on the loopback (localhost) IP address of 127.0.0.1. This means that I can only access the tunnel from my laptop (add the -g switch to make it listen on all IP address in use on the machine).
We can also see the second half of the IMAP connection if we use netstat on core:
andre@core[~]netstat -a | grep mail.mac.com
tcp4       0      0  core.dreness.com.50484 mail.mac.com.imap      ESTABLISHED
mail.mac.com.imap means the IMAP port on the host mail.mac.com.
All that's left now is a trip to my mail application's preferences to point it to localhost:42424 instead of mail.mac.com.
Case 2: Tunneling through firewalls
Before we jump in here, it should be noted that firewalls exist for a purpose, and that purpose usually includes increasing the security of things on the network inside of the firewall. Before you go establishing persistant connections through a firewall, consider the security implications. Abuse of this information can cause companies to do stupid things like blocking port 22 alltogether.So, let's say I work at a company where there is an internal network which is connected to the Internet, and that network's connection to the Internet is going through a firewall and / or NAT (network address translation). NAT is great in a lot of ways: it conserves IP addresses, and it also increases security by only allowing traffic into the network if it has been requested from the inside (example, user hits a website, webpage is allowed back through to the user's computer). Without even getting into the mechanics of NAT, these two advantages should be pretty comprehensible. NAT insures that connections from the Internet cannot be made to devices on the local network. Sometimes, though, you want to be able to make a connection from the outside. For example, let's say you have a fileserver that's only accessible from the inside network, but you want to be able to access it from elsewhere over the Internet. In a NAT / firewall sitaution, you have two options: 1) alter the firewall rules or create inbound port mapping entries on the NAT device (this requires work by the network admin, obviously), or 2) set up a reverse SSH tunnel which can tunnel traffic back into your network.
Obviously, we're going for option 2 :). This time it's a little different, and the main difference has to do with where the SSH tunnel is created and where the entry point to the tunnel is located. In the previous case, the SSH tunnel was created on the same machine that is the entrance to the tunnel. With reverse tunnels, it's... backwards ;) We'll create the tunnel on the inside of the firewall between, say, my desk workstation, and an SSH server on the Internet somewhere. The listener port is created on the *remote* side of the tunnel, and connections made to it are tunneled through the firewall, reach my workstation at work, and then proceed to a destination that we specify.
Here's an example where we create a tunnel that allows me to access a fileserver at work that's behind a firewall.
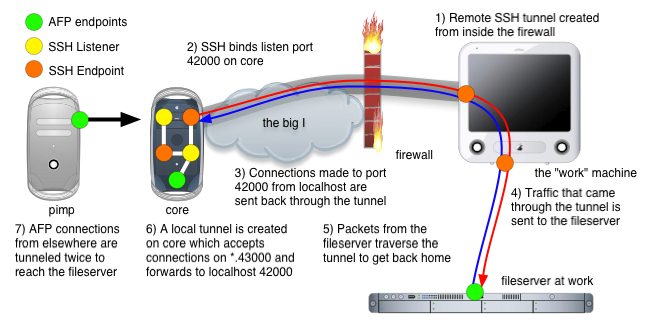
Click here for a QuickTime Animiation of this image.
Here's how we create the SSH tunnel on the 'work' machine.
ssh -R 42000:fileserver.company.com:548 -f -N core.dreness.com-R is for remote, indicating that the listener ports are bound on the remote end of the tunnel. Remote listener port:destination address:destination port. Again, -f and -N also, and again, we're using core.dreness.com.
Now on core, I can open up "Connet to Server" and hit afp://localhost:42000 to reach the company fileserver. But let's suppose (hypothetically speaking, of course ;) that core is a server and not a workstation. In that case, I don't want to connect from core, I want to conenct from some other machine on my home network. To facilitate this, there is one more hoop we need to jump through.
Remote SSH tunnels will only listen on 'localhost', meaning that I can only make connections into the tunnel on the same machine that is the remote end of the tunnel. This is validated by using netstat on core, whichs is the 'listener' end:
andre@core[~]netstat -na | grep -i listen
tcp4       0      0  127.0.0.1.42000        *.*                    LISTEN
If I try to make a connection from my home workstation, I get a whole bunch of nothing:
andre@pimp[~]telnet core.dreness.com 42000
Trying 216.231.49.147...
telnet: connect to address 216.231.49.147: Connection refused
telnet: Unable to connect to remote host
... but if I do it from core, it works:
andre@core[~]telnet localhost 12000
Trying 127.0.0.1...
Connected to localhost.
Escape character is '^]'.
If we want to be able to use this tunnel from pimp (the workstation), we need to create an additional ssh tunnel on core, and use the -g switch which makes it listen on all available addresses:
andre@core[~]ssh -L 43000:localhost:42000 -f -N -g andre@core.dreness.comNow we're creating listener port 43000 on core which points packets at localhost port 42000, which is the remote end of our first SSH tunnel. Note the -g switch. A look at netstat shows that we are, in fact, listening on more than just localhost:
andre@core[~]netstat -na | grep -i listen
tcp4       0      0  *.43000                *.*                    LISTEN
*.43000 means port 43000 on all available IP addresses. And that's it!. Now I'll just make a connection from pimp to core on port 43000...
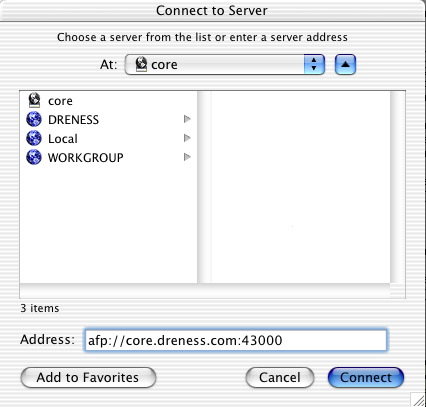
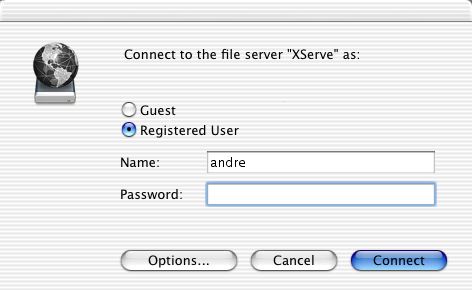
... and then I get an authentication challenge from the fileserver at work! Cool!.
A slight variation of this is also handy for just allowing remote SSH access to my work desktop machine from core (this is executed on my work machine):
ssh -R 11000:1.2.3.4:22 -f -N core.dreness.com1.2.3.4 would be the IP address of my work machine. As a safety measure, we should be sure that we deal with any connection problems by using a script that will dig a new tunnel should the existing one collapse for one reason or another. Here's a script that runs on my workstation at work every 5 minutes:
#!/usr/bin/perl -w
if ( `ps x | grep 11000:1.2.3.4:22 | grep -v grep` ) {
        print "running okay! \n";
        } else {
        print "reloading... \n";
        system("ssh -R 11000:1.2.3.4:22 -f -N core.dreness.com");
};
All we're doing here is looking for the process that represents the tunnel, and if we don't find it, starting a new tunnel. The process disappears if the connection dies, so this works pretty well.
Questions / comments go to me.
Updated 11/28/03